How to draw Scientist Step by Step Guide
Draw Scientist with one-line drawing
Throughout humanity’s experiences, humanity has achieved mind-boggling accomplishments in many fields, like design, farming, medication, and various practices. These accomplishments would have been incomprehensible without the splendid personalities of numerous people who gave their gifts to logical revelation and advancement. Scientist Drawing
Researchers likewise highlight many types of narrating and media, and they frequently catch a considerable amount of public interest. Figuring out how to draw a researcher can be an excellent method for showing appreciation for these significant figures!
Our bit-by-bit guide on the most proficient method to draw a researcher will show you how it tends to be finished while having heaps of tomfoolery!
The most effective way to attract a researcher is through various stages.
Instructions to Draw A Scientist
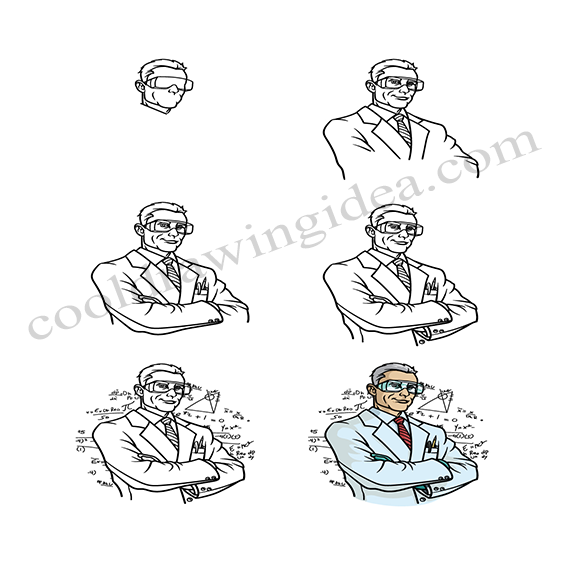
Stage one
We will begin with his head to start this aide on the most proficient method to draw a researcher. This will be a relative point-by-point drawing, so if you find it a piece threatening, you can draw with your pencil first before going over it with a pen later.
Considering that, we will begin drawing his head. He will wear defensive goggles to shield his eyes from any synthetics or substances he might work with.
First, you can draw his face and head diagram, and afterward, remove the goggles we referenced. When that is finished, you can pull his hair on his head and add his ears and neck.
Stage two
Next, draw his facial subtleties and chest.
We will add a considerable amount to your research by attracting this step! To start with, we will zero in all over. Begin by drawing his eyes behind his goggles. Then we will utilize some basic linework to add his nose, mouth, and a few wrinkles to his cheek. The look we are portraying makes him look pretty pleased with himself!
Then, we will draw his chest and begin his arms. In the first place, add a collar to the foundation of his neck, and afterward, you can draw his secure coming. You can then draw the necklines of his coat descending and add his shoulders too. At last, we will involve a few bent lines for the beginning of his arms.
Stage three
Draw his crossed arms
Since you have begun the arms, he crosses at his chest. You can now complete them in this step of our aide on the most proficient method to draw a researcher.
Utilizing the reference picture to direct you, draw the arm on the left moved over to the opposite side, and afterward remove his other arm wrapped up. On the right-hand side of his crossed arms, you can draw a pocket for certain pens and pencils, as the need might arise to take heaps of notes!
Stage four
Finish the framework for your scientist
It’s nearly time to continue toward a few last subtleties, yet first, we want to polish off the framework for your researcher drawing. You can do this by polishing off the sleeve for the arm on the right. Like the other one, this sleeve will have a few buttons. Then, we will draw his midriff descending from his arms, and you can add a button.
Stage five
Finish off your scientist drawing
You have completed the vast majority of the drawing currently, yet in this step of our aid on the most proficient method to draw a researcher, we will polish off for certain last subtleties. Researchers in all fields need to manage loads of numerical conditions and hypotheses, so we felt that would be a tomfoolery subject for the foundation of the picture.
We drew a few numerical images and conditions to the foundation, and you can recreate them as they show up there to go with a comparable subject. On the off chance that you incline toward a more substantial foundation, you could draw a setting for him, all things being equal.
Perhaps he’s in a lab encompassed by vials and synthetic compounds, or perhaps there could be a cool robot that he is building! These are only a few thoughts, so will you go for our experience or draw your remarkable one?
Stage six
Finish off your researcher drawing with some tone
We will polish off certain cool tones for the last piece of your researcher drawing. In our reference picture, we went with a principally blue variety conspire for his outfit and goggles.
We hued his tie in red to add a sprinkle of hotter variety. These are the ones that we decided on for our picture, yet they are only an idea that you can utilize! This is your drawing, so you can likewise integrate a few shades fitting your very own preference.
Picking the varieties is the initial step. Then, at that point, all that remains is picking the craftsmanship mediums you will use to accomplish them. You could go for some more severe acrylic paints or shaded markers for one look. Watercolors and hued pencils would turn out better for a more muffled look.
These are only a couple of the mediums you could utilize.